|
|
| PJRC.COM Offline Archive, February 07, 2004 Visit this page on the live site |
| ||
|
Shopping Cart
|
| Home | MP3 Player | 8051 Tools | All Projects | PJRC Store | Site Map |
|
You are here:
8051 Tools
| Search PJRC |
|
|
|
Download The SDCC C Compiler Here (free download!), if you do not have SDCC. This LED blink example requires SDCC and GNU Make. The windows SDCC download from this site includes GNU Make. Virtually all linux systems already have GNU Make pre-installed.
The description here assumes you are familar with how to communicate with the 8051 development board and download and run programs on it. If you haven't done this yet, the Using The Board For The First Time page explains in detail exactly how to setup communication with the board and download programs to it and run them.
Of course, you need to download the LED Blink SDCC source code:
As a first step, you should try downloaded one of these to your board and run it. To run the program, use PAULMON2's Jump command (press 'J') and use it to jump to address 2000. Address 2000 is the default if you haven't done any other operations in the monitor which change the current address. When the program runs, you should get a display like this:
|
Figure 1: LED Blink Example Program |
The pre-built HEX files are compiled with a "VERBOSE" option that makes them print messages as they run. You should see line after line appear like this:
As the program runs, it checks if you have pressed the ESC key, and restarts the board back to the monitor when it sees that you're pressed ESC.
Inside blink1.c, you'll find the main loop that makes the program run:
        while (1) {
                if (delay_table[i] > 0) {
                        p82c55_port_c = pattern_table[i];
                        delay_ms(delay_table[i]);
#ifdef VERBOSE
                        pm2_pstr("Pattern=0x");
                        pm2_phex(pattern_table[i]);
                        pm2_pstr(" for delay=");
                        pm2_pint8u(delay_table[i]);
                        pm2_newline();
#endif
                        i++;
                } else {
                        i = 0;
                }
                if (pm2_esc()) pm2_restart();
        }
The line with the function call to "delay_ms" is what controls the speed of the animation. A simple change to increase the speed of the display is to divide the delay constants, like this:
delay_ms(delay_table[i] / 3);
Once you've made a small change to the program, you will need to recompile the application. Fortunately, this is easy with GNU Make.
To recompile the application, just type:
make
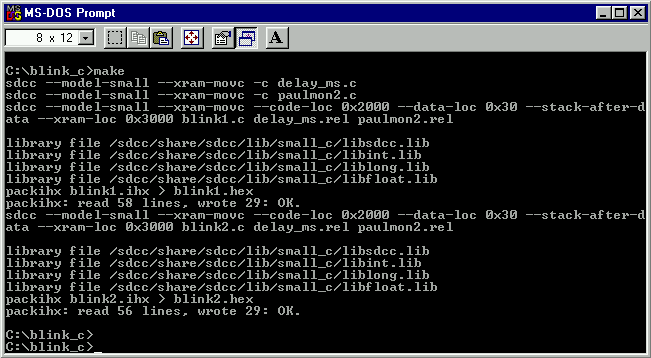
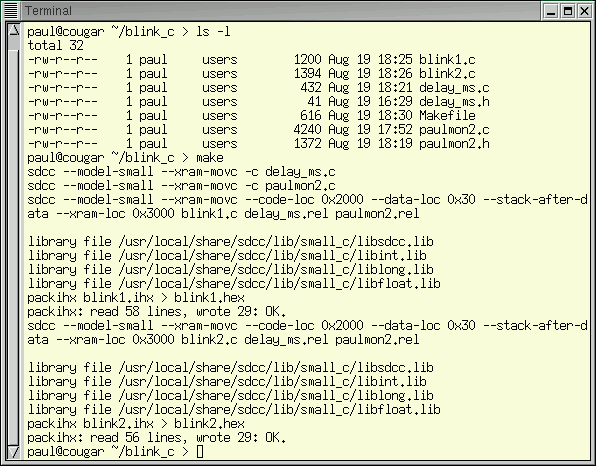
GNU Make will examine all of the project files, recompile the portions of the project that have changed, and build a new copy of the application. Figures 2 and 3 show what should happen, using both the MS-DOS Prompt in Windows and the Gnome Terminal in Red Hat Linux 7.1.
When you download and run the new HEX file, it should display the animation much more rapidly.

Figure 2: Using SDCC & MAKE (Windows/MS-DOS Prompt), To Build BLINK1 and BLINK2 |

Figure 3: Using SDCC & MAKE (Linux/Gnome Terminal), To Build BLINK1 and BLINK2 |
| BLINK1.C - Number Array Definition | BLINK2.C - Struct Array Definition | ||
|---|---|---|---|
|
| ||
|
Blink1 uses a pair of arrays of unsigned characters (numbers 0 to 255)
to hold the pattern and delay for each step of the animation. Blink2
defines a C structure which represents each state of the animation,
and then uses only a single array to hold a group of these structs.
Blink2 uses more C syntax to declare the struct, but then the initialization
of the data is more compact and has the advantage of some simple
checking by the compiler as the code is built. Blink1's simpler
syntax is probably easier for new users.
Both approaches work, and which to use is a matter of personal choice. In both cases, the data is declared with the SDCC "code" qualifier, which causes the variable to be allocated in read-only code memory. Using memory type qualifiers usually leads to much more efficient code generated by SDCC.
| |||
| BLINK1.C - Numerical Index Into Arrays | BLINK2.C - Reading With A Pointer | ||
|
| ||
|
In Blink1 the individual elements are accessed using
an index variable, which is reset to zero when the animation loop
is restarted. Blink2 uses a pointer variable, which is a very
technique used to access structures in C.
When the [i] syntax is used, the compiler mulitplies i by the size of the array elements (1 byte in this case) and adds it to the address where the array was stored. The p-> is C's standard syntax to access members of the struct that the pointer is currently pointing to. In this case, the compiler adds the offset of the named portion of the struct to the address stored in the pointer. The i++ statement will always increment the i variable by 1. Using pointers, p++ causes the compiler to add the size of the structure (2 bytes in this example) to the address stored in the pointer. Use of complex structures and pointers is common in many C programs and examples. If you are learning C programming while also struggling to learn the 8051 environment, hopefully this simple example will make the common structure and pointer syntax a little clearer.
| |||
To use PAULMON2's serial I/O routines, you must include the "paulmon2.h" header file, which provides the ANSI C function prototypes needed to call them. The file "paulmon2.c" contains small C functions which adapt SDCC's calling conventions to the necessary assembly language calling conventions used by PAULMON2's routines.
Here is a list of the functions you may call:
void pm2_cout(char c);
char pm2_cin(void);
void pm2_phex(unsigned char c);
void pm2_phex16(unsigned int i);
void pm2_pstr(code char *str);
char pm2_esc(void);
char pm2_upper(char c);
void pm2_pint8u(unsigned char c);
void pm2_pint8(char c);
void pm2_pint16u(unsigned int i);
void pm2_newline(void);
void pm2_restart(void);
void pm2_interrupt_remap(void);
You can also use the SDCC C library printf, if you create a "putchar" function. Here is the code to add:
/* required for using printf, printf_large, printf_fast, etc */

void putchar(char c) {
        pm2_cout(c);
}
This example is a simple and unsophisticated software delay using a busy loop. This sort of delay is very simple, but for real applications it is usually necessary to do something while waiting, other than executing NOP instructions. Still, this simplistic example does use several of the basic inline assembly features.
void delay_ms(unsigned char ms)
{
        ms;
        _asm
        mov     r0, dpl
00001$: mov     r1, #250
00002$: nop
        nop
        djnz    r1, 00002$
        djnz    r0, 00001$
        ret
        _endasm;
}
SDCC's inline assembly syntax begins a block of assembly
with _asm and ends it with _endasm.
To SDCC, this block, including the _asm
and _endasm is a single C statement, so it
must be terminated with a semicolon (it's easy to forget
the semicolon after concentrating on assembly language).
SDCC passes the input parameter in DPL. It actually uses DPL, DPH, B and A, in that order, for 8, 16 and 32 bit parameters. This function has a "void" return, but DPL, DPH, B and A are also used when there is a return value. Normally, SDCC assumes that any function it calls will use R0 through R7, so these is no need to save these registers before writing into them.
This simple code uses two nested loops, where is runs two NOP (no operation) instructions in the inner loop. The registers R0 and R1 act as loop counters, which are initialized by the two MOV instructions. The DJNZ (Decrement and Jump if Not Zero) counts down the number of times to repeat each nested loop. The RET instruction at the end is actually not necessary, as SDCC will include a return at the end of the function.
Within a function, local labels are defined as
00001$ to 00099$. Using these
labels isn't very descriptive, but it does provide a set
of labels that will not conflict with any other labels
that SDCC generates based on the C code. Hopefully 99
labels will be enough!
At the top of the code, before the assembly is an unusual
C statement: "ms;". This is done to create
a dummy reference to the "ms" parameter. Even though this
does not generate real code, it does prevent SDCC from
printing an annoying warning that the variable is declared
but not used.
Though not shown in the particular example, it is possible for inline assembly to access global variables. The C variable name need a underscore '_' prepended to it when used within assembly. It is also necessary to know what type of memory the variable is stored in, as each type of memory requires different 8051 instructions to access. SDCC does not provide a way to access local variables from inline assembly.
It isn't necessary to become a makefile expert to use a Makefile for your own project. The Makefile in this example was designed to be easy to reuse as a basis for your projects. This section describes how it works, and how you may need to adapt it for a typical project. If you are already familiar with make and Makefiles, you should probably skip this section.
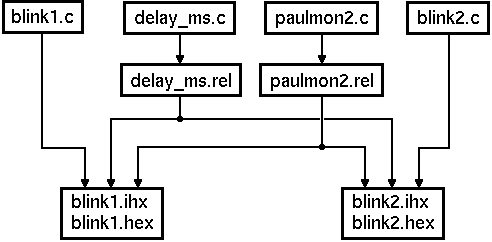
The blink example builds two different executables, from blink1.c and blink2.c. Each executable uses the code in delay_ms.c and paulmon2.c. These two files are first built into .rel (relocatable object code) files, and the each executable is created by compiling its C code and linking with the .rel files. Figure 4 shows a diagram of this build process.

Figure 4: Build flow, turning the C source files into intel HEX executables. |
When you run make (or MAKE.EXE), the make program reads a file named "Makefile" which contains the instructions that specify how to build the project. It is easy to think about building the project, particularily for a C programmer, as executing a sequence of steps, but this is NOT how the Makefile works.
The Makefile specifies the various files that get built, what other files are used to build them, and the command(s) to run. The make program analyzes the structure of your project, looks at the timestamps on the files, and exectutes only the steps required. If your project has many files and only a small number have been changed (the common case), only some portions of the project need to be recompiled. This can really shorten the time required to recompile your project, particularily on a slower computer or when using Windows/MSVCRT (which runs SDCC noticably slower than Linux/GNU_glibc2).
Looking at the Makefile, here are the lines that tell make how to build blink1.hex:
blink1.hex: blink1.c delay_ms.rel paulmon2.rel
        sdcc $(SDCCCFLAGS) $(ASLINKFLAGS) blink1.c delay_ms.rel paulmon2.rel
        packihx blink1.ihx > blink1.hex
The first line specifies that this section will cause "blink1.hex" to be created. The files listed after the colon ':' are the list of files that will be read in the process of creating blink1.hex. Blink1.hex is often called the target and the list to the right of the colon is often called dependencies. This group of lines is called a rule. When speaking about makefiles, people often talk of the rule that is used to build the target from the dependencies. Knowing this lingo will make it easier to ask experts for help with your own Makefile (and conprehend their answers :). When creating a makefiles, usually the most important thing to check is that the all of the required files are specifed in the dependency list.
The remaining lines are a list of commands that need to be executed to create blink1.hex. Each command must be indented with a TAB character. This unfortunate syntax can be confusing, so please be careful to use a real TAB character and not 8 spaces. The first command runs SDCC to compile blink1.c and also link the .rel files into the executable. SDCC produces .ihx output files, and the PACKIHX program is used to turn the .ihx files into normal .hex format. The SDCC command uses two variables, SDCCCFLAGS and ASLINKFLAGS. This is just a simple text replacements, which allows these flags to be set in just one place at the top of the Makefile.
The rule to build blink1.hex specifies that delay_ms.rel and paulmon2.rel are both needed. Both of those files are built by this rule:
%.rel : %.c %.h
        sdcc $(SDCCCFLAGS) -c $<
This is what's called an implicit rule, which really only means that it uses special wildcard characters and will be used to build any .rel file that doesn't have it's own explicit rule. This rule specifies that there is a matching .h file for the .c file, which is common practice for including the function prototypes, structure definitions and global variable declarations in both this .c file and other parts of the project which interface with this file's code. Some programmers prefer to create one .h file will all their definitions. If you do this, you would replace the "%.h" with the name of your common header file.
With all these various rules, how does make "know" which to build? The answer is that make will strive to build the first non-implicit rule in the file, unless of course you specify the rule you want on the command line. In this Makefile, there is a pseudo rule called "all", which is used to direct make to build more than one output file.
This rule means the nothing needs to be done to build "all", but both blink1.hex and blink2.hex must be built before this "nothing" can be done. When you adapt this Makefile to your own project, you could remove blink2.hex from this rule's dependencies, or just remove this rule alltogether, leaving the rule to build blink1.hex as the first rule. Of course, you would remove the rule for blink2.hex, and rename your project something more interesting than "blink1". As you add more .c and .h files to your project, you would just add them to the dependency list and SDCC command in the rule that builds and links the HEX file. If the list becomes long, you would probably define a variable, like RELFILES and use it in both the dependency list and SDCC command.
The Makefile contains one final rule, called "clean", which has no dependencies. Normally this rule will never be executed, because none of the other rules mention "clean" as a dependency. Including a clean rule in the Makefile is a standard convention for specifying a list of commands to delete all the files the compiler, assembler and linker will create that aren't the original source code. The example Makefile uses the unix "rm -f" command, so for windows you would need to replace with the equivilant dos DEL commands or install a RM program.
Hopefully this simple introduction and the example Makefile will allow you to make good use of GNU Make for your own SDCC-based projects. Most SDCC-based projects can use this example Makefile with only minor changes. GNU Make is very flexible and has many sophisticated features which can support building very large and complex projects, so as your needs grow, GNU Make will probably be able to accomidate them. There is a complete manual for GNU Make. The manual is also available as a printed book. (TODO: link to where to buy the book...)