

Project 2 - Autofill
design2.txt - due 5/6 before 11:59 PM EST
project2 - due 5/13, before 11:59 PM EST
Orginally by Mr. Lupoli
Hit the space bar for next page


design2.txt - due 5/6 before 11:59 PM EST
project2 - due 5/13, before 11:59 PM EST
Orginally by Mr. Lupoli
Hit the space bar for next page
The purpose of this assignment is to give you practice with:
As always, you should continue to practice using top-down design and good implementation techniques.
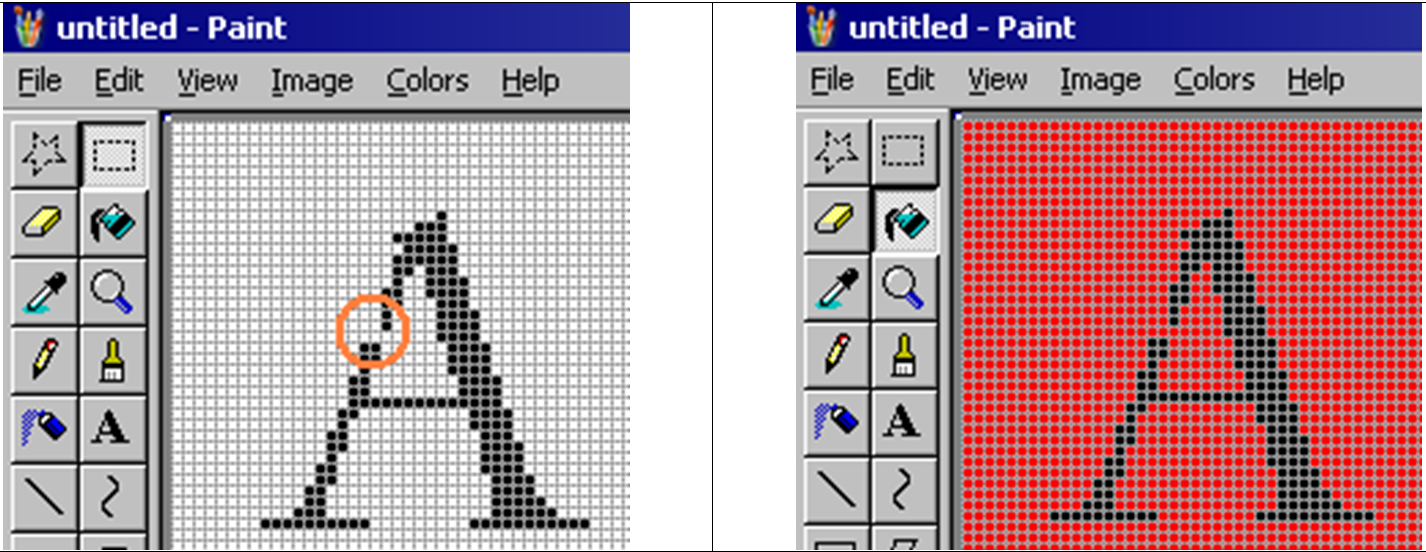
Autofill in paint uses a recursive algorithm to "spread" the paint to pixels of the same color.
Looking at the example below, the "fill" tool is in the middle of the A, when clicking the tool ONCE,
it fills in the rest of the area that is in white.

Notice that the fill did NOT extend into the black (or non-white) colored pixels or beyond the borders.
Any non-white colored pixel within borders is a natural barrier that does not allow the fill to spread.
Notice if there is a "crack" in the design like in the example below, it will spread beyond, but still
does not fill in the natural barrier.

If there is any white space connected to the original location to fill, it will be changed. Autofill
looks at locations UP, DOWN, LEFT and RIGHT from the original spot, and continues the spreading action
in the next pixel.
The "Picture" file is no more than a text file with .'s and x's. The .'s are the white spaces, while the x's are the natural borders. (x's cannot be changed). Here is a sample below:
.....xx........
....x..xx......
....x....xxxx..
...x........xxx
..x............
...x........xx.
...x..xxx...x.x
...x..x..x.x...
...xxxx...x....
...............
Here is a sample of the picture file. matrix1.txt
As a programmer, you will:
Your assignment will be to autofill a given "picture" when the user gives the file name of the "picture file", row and column to start the fill. The program will display the picture BEFORE the autofill and display and write the results after the autofill.
python proj2.py matrix1.txt 0 0
Here is a sample of output of this program.
Please note that the sample output only shows what is expected from your program if the user is actually entering everything as instructed.
This is not a test of the program at all, but just a sample for your clarification.
Matrix BEFORE Autofill
.....xx........
....x..xx......
....x....xxxx..
...x........xxx
..x............
...x........xx.
...x..xxx...x.x
...x..x..x.x...
...xxxx...x....
...............

Matrix AFTER autofill, starting a location 0,0
xxxxxxx........
xxxxx..xx......
xxxxx....xxxx..
xxxx........xxx
xxx............
xxxx........xx.
xxxx..xxx...xxx
xxxx..xxxx.xxxx
xxxxxxxxxxxxxxx
xxxxxxxxxxxxxxx
Allow other SINGLE characters as the fill. (OTHER than 'x'.) You must specify the character in the last spot in your command line.
Also, in this extra credit, whatever coordinate is given, it will use that character as the character to be filled.
Example 1
python proj2.py matrix3.txt 6 12 Y

Matrix BEFORE autofill
.......................
.............*.........
............***........
...........*.**........
..........*..**........
.........*....**.......
........*.....**.......
.......**********......
......*........**......
.....*..........**.....
....**..........***....
..*****........*****...
.......................

Matrix AFTER autofill, starting at location 6, 12
.......................
.............*.........
............***........
...........*Y**........
..........*YY**........
.........*YYYY**.......
........*YYYYY**.......
.......**********......
......*........**......
.....*..........**.....
....**..........***....
..*****........*****...
.......................
python proj2.py matrix4.txt 6 12 Y

Matrix BEFORE autofill
_______________________
_____________*_________
____________***________
___________*_**________
__________*__**________
_________*____**_______
________*_____**_______
_______**********______
______*________**______
_____*__________**_____
____**__________***____
__*****________*****___
_______________________

Matrix AFTER autofill, starting at location 6, 12
_______________________
_____________*_________
____________***________
___________*Y**________
__________*YY**________
_________*YYYY**_______
________*YYYYY**_______
_______**********______
______*________**______
_____*__________**_____
____**__________***____
__*****________*****___
_______________________
python proj2.py matrix3.txt 2 13 A

Matrix BEFORE autofill
.......................
.............*.........
............***........
...........*.**........
..........*..**........
.........*....**.......
........*.....**.......
.......**********......
......*........**......
.....*..........**.....
....**..........***....
..*****........*****...
.......................

Matrix AFTER autofill, starting at location 2, 13
.......................
.............A.........
............AAA........
...........*.AA........
..........*..AA........
.........*....AA.......
........A.....AA.......
.......AAAAAAAAAA......
......*........AA......
.....*..........AA.....
....**..........AAA....
..*****........AAAAA...
.......................
You must be logged into your account and in the same directory as the file you are trying to submit.
To submit your design, type the following at the linux prompt:
submit cs201 Proj2 design2.txt
To submit your project, type the following at the linux prompt:
submit cs201 Proj2 proj2.py
To verify that your files were submitted, you can execute the following command at the Unix prompt. It will show all files that you submitted in a format similar to the Unix 'ls' command.
submitls cs201 Proj2