General Project Description
You have just recently started an internship with GamesCo - a local interactive
game company and your supervisor wants you to create an electronic version of
the old BattleShip game. You will be responsible for creating the interface
that users will see, all of the game logic, a networking component that will
allow users to play each other head-to-head, and an artificial-intelligence
component that will allow users to play the computer.
Each phase of this project will add on a different component so that by the
end of the five phases, you will have a completely operational BattleShips
game.
Project Description
Project Modifications
- Use inheritance to add a Player base class
- Create an inheritance hierarchy using the Player, Human and Computer classes
- Use both virtual and pure virtual methods in your hierarchy
- Extend the application to play against other student applications
- Add the capability to run the application as a server or client
- Alter the command-line arguments
These last two requirements will necessitate using the provided KLSocket class
to support running your application as a Server or as a Client. A Server
accepts a connection from a Client application and then they exchange messages
until one of the chooses to disconnect (for our application the message "WIN"
will indicate that both the client and server should end).
The Server/Client architecture is a basic component of all of today's internet
applications. In order to use this functionality, you will run your
application twice, first as a server (leave it running), and then as a client,
using a separate terminal window.
Once both are running, the two will be able to communicate and play BattleShip
against each other.
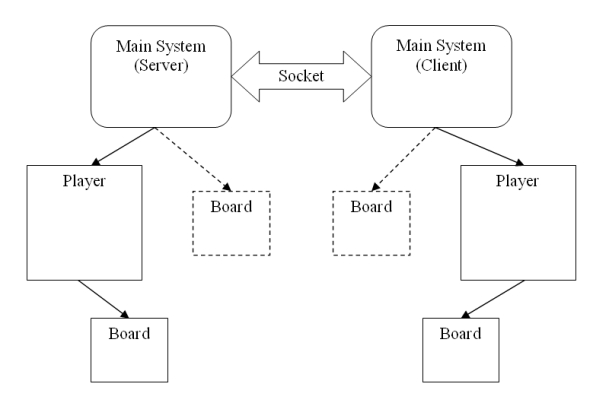
Above is a graphical depiction of what your system may look like
and may give you an idea of what needs to happen. The main system will
interact with a single Player "object" (either a Human or a Computer) which
has access to one or more boards. Your main system may also have access to
one or more boards (this is the dashed line). The key component here is the
socket-based communication between two main systems - both of which can begin
as the same main, but will have an if/else statement somewhere that will modify
the actions slightly.
Functional Description
Your application will function similarly to previous projects, but in addition
to having the ability to play two players head-to-head using
any mixture of human and computer players, it will also have the ability to
play these using your own application or
by pitting your application against another student's.
Command Line
The application will have an altered command line to accept the following:
- Board file
- HUMAN or COMP - will this be a human or computer player?
- SERVER or CLIENT - will this be a server or client?
- Port number - a number between 49152 and 65535
- [Client only] Host name - the IP address or machine name that the server
is running on (usually linux1.gl.umbc.edu or linux2.gl.umbc.edu)
Any extra or incorrect command-line parameters must result in an error message
accompanied by a "Usage" message, detailing the correct use of the application.
The second command-line argument is no longer optional and must be either
HUMAN or COMP, indicating which player should be used for the current
execution of your application. This no longer indicates who will go first.
The third argument which will be either SERVER or CLIENT indicates whether
the current execution will be the Server or the Client.
The fourth argument is the port number that the server is running on (or will
run on if this is the server).
The final argument is only required for the client and is the machine name or
IP number that the server is running on.
An example of properly running the applications might be:
Server (always start this first):
Proj3 b1.txt HUMAN SERVER 61038
Client:
Proj3 b2.txt COMP CLIENT 61038 linux2.gl.umbc.edu
You can pit your application against any other student application by simply
running one as a server on some port and the other as a client on the same
port. Be careful when choosing a port-number, if you recieve garbage from
the port (or unexpected values) - another student in the class might be
using the same port number - simply change to another port number. This is a
highly unlikely occurance, but as the project deadline nears, you might find it
occuring more frequently. There is no need to exchange code, you can both
simply run your application from your own account.
Design and Implementation Requirements
Classes
Player Class
You must introduce a Player class that is the base class of an inheritance
hierarchy where the Computer and Human classes inherit data and operations
from the Player class. You must demonstrate an appropriate use of a virtual
method (other than the destructors) and a pure virtual method.
In designing your inheritance hierarchy, ensure that you adhere to the
following guidelines:
- Base classes have data that is commonly required by all derived classes
- Base classes have methods that are commonly required by all derived classes
- Derived classes add data that is unique to only that class
- Derived classes use, extend, and replace base class methods
- Virtual methods allow derived classes to extend and replace base class
methods
- Pure virtual methods define a single interface at the base class level
that is implemented at the derived class levels.
In order to support Polymorphism and the ability to run your application as
either a human or a computer, you will need to ensure that you dynamically
allocate all Human and Computer objects using base-type (Player) pointers.
Communication Protocol
The KLSocket class has been provided to you in the form of a pre-compiled .o
(object file) and a .h. Another employee in the company wrote this code many
years ago, but has since left the company, leaving the code for you to use.
Unfortunately, this employee did not document the code well, nor did he/she
leave the .cpp files - all you have is the .o. Thankfully he/she left an
example (socketApp.cpp) of how to use the class. You must refer to the .h
file and the socketApp.cpp file to get an idea of how to use the class.
Server
The server must print a message that says something like:
"Server running on port: 51234"
If the server fails to open the socket, the server must print an error message.
If the server detects a win condition during the game, it must print a message
indicating the winner.
If the connection to a client is successful, the server should then go into a
loop sending and receiving messages from the client.
Client
The client must print a message that says something like:
"Connecting to host: linux1.gl.umbc.edu"
"Connecting on port: 51234"
If the client fails to connect to the server, the client must print an
error message.
If the client detects a win condition during the game, it must print a message
indicating the winner.
If the connection to a client is successful, the server should then go into a
loop sending and receiving messages from the client.
Linking to KLSocket.o Updated!
You should link the KLSocket.o class from the project directory in your makefile
instead of submitting the file with your project. You can do this by adding
the complete path to the file in the OBJECTS line of your makefile. You can
also introduce several macros to simplify this, such as:
SOCKET=/afs/umbc.edu/users/d/a/dana3/pub/CMSC202/p4/KLSocket.o
OBJECTS= /* some stuff here */ $(SOCKET)
That should enable your code to use the KLSocket.o library from the project
directory. While you are developing your code, feel free to make a copy and
use that as it will enable your application to run slightly faster and probably
compile/link a little faster. But, when you turn in your code, do not
submit the KLSocket.o file (do submit the KLSocket.h file). Simply
add the above lines, that way when you submitrun, it should work and there
won't be 150 copies of KLSocket.o in the submission directories.
Warning: Do not add the $(SOCKET) to the 'make clean' or 'make cleanest'
targets - this will cause your makefile to attemp to delete something that you
don't have write access to and will cause a makefile error/warning.
Messages
Once a connection has been established, the client's first message will be the
initial square the client wishes to attack (Ex: A 0). So, the client will
always go first in this version of the application. The server will then
respond with the message "HIT" or "MISS", appropriately. The server will
then send the square it wishes to attack (Ex: A 0). The client will reply
with a "HIT" or "MISS". When either the client or the server detects that the
final ship has been sunk, instead of sending the "HIT" message, it will send
a "WIN" message indicating that the other player has won the game. At that
point both the client and server must print a message to the user indicating
who has won the game. After recieving a HIT/MISS message, the server and
client should reply with "ACK" which acknowledges the receipt of the last
message.
An example of a sequence of messages might be:
client: A 0
server: MISS
client: ACK
server: C 1
client: HIT
server: ACK
client: B 7
server: HIT
client: ACK
server: B 1
client: MISS
...
server: F 2
client: WIN
Error Checking Messages Updated!
You will want to error-check the messages that you receive from other servers
or clients. This is relatively simple as you know what type of message to
accept. If your application gets an incorrect message or a square that
doesn't exist, it should exit with an error message. We will NOT be testing
this, but for your own sanity and your own debugging process, you should
implement at least a basic "sanity" check on all messages read from the
opponent.
Extra Credit
Stack-based AI: 10 points
We mentioned that using the Queue class is a basic AI technique, but what is it
about the Queue that makes it a good strategy? If we use a different data
structure can we get a better result?
Using the same strategy as the original Queue class, implement a Stack class
(last-in, first-out). You must use the same node-based dynamic data structure
that you used for the Queue class. In fact, if you just make some basic
modifications to your Queue class, you shouldn't need to generate the whole
thing from scratch.
In order to determine which is the best strategy, you should devise a "testing
suite" that you can use to examine which strategy is best and in which
situations. For example, if the ships are randomly distributed, which is
better? If the ships are clustered, which is better? If the ships are in a
line, which is better? You should plan on running your tests LOTS of times and
you must collect the data and analyze the results. The above questions are NOT
a sufficent set of questions to ask/answer in your test suite - you need to
think of some other comparisons to make between the two. I would recommend
running each test at least 100 times to get a good sample-set of results. Some
of the metrics you will want to collect are: how many turns were taken? How
many squares were missed? How many squares were hit before a loss? You should
also think about what the opponent's strategy should be - should you write an
opponent
that guesses all the ships correctly? One who never wins? Or should you
run the AI against itself? Or should you use a combination of these and test
all of them (hint, hint)?
Add a command-line argument to your application that indicates "QUEUE" or
"STACK" - which should be used.
To get credit, you must submit a README file along with your code for
the Stack class and the automated test suite (add this to your makefile). Your
README file must include a description of your testing suite, directions for
running and building your testing suite, and a discussion on which performed
better and under what conditions. Finally, it must include a discussion about
why you believe these are the results - given the data, what conclusions can
you make about why one class performs better (or the same) as the other? Why
do you think this is happening? What about the BattleShip game makes one class
a better choice than the other?
3 Levels of AI difficulty: 10 points
The Queue-based strategy is a basic AI technique used to list a bunch of "good"
guesses for the future. There are many other techniques that you can implement
that may be more game-specific. You will add three levels of difficulty to
allow a variety of users to be challenged by your application.
- Easy - This must be "easier" than the Queue-based strategy but must include
at least one component that makes it harder than just "random selection".
- Medium - This should be the Queue strategy. But you may want to add one
or two more challenging components that will improve the performance.
- Hard - This strategy must employ more advanced AI techniques to the game
and must show a significant improvement over the Medium strategy.
In order to demonstrate the difficult of each of these strategies, like the
Stack-based AI component, you must create a test suite that thoroughly tests
the different strategies against a variety of board structures (and ship
placement strategies) as well as a variety of opponents. Refer to the Stack
description for more ideas on what to implement.
Add a command-line argument to your application that indicates "EASY" or
"MEDIUM" or "HARD" - which should be used. This must be the same argument
as the "STACK"/"QUEUE" argument for the other extra credit
To get credit, you must submit a README file along with your code for
your strategies and the automated test suite (add this to your makefile). Your
README file must include a description of your testing suite, directions for
running and building your testing suite, and a justification of how each
represents a "significant" improvement over the last. Use your data analysis
to support your claims that each "harder" level is a significant improvement
over the last (you should probably see the same improvement from the easy to
the medium as you do from medium to hard, for example if the medium strategy
takes 5% fewer attempts than the easy, then the hard should take 5% fewer
attempts than the easy). Finally, include a discussion on what about your
"hard" strategy takes advantage of the structure of the BattleShip game to
produce a more intelligent AI component.
BONUS Extra Credit: 0-5 points
As a special treat, for students interesting in competing in an AI tournament,
we will run all interested students' work through a series of battles with each
other, using a single-elimination, tournament-style structure. Each "game"
will consist of 3 rounds, of which the winner (winning 2 of 3) moves up to the
next round. The ultimate winner will receive 5 points, second place will
recieve 3, and third place will receive 1 point.
In order to participate, you must put a file named "BATTLE" in your
submission directory (it can be an empty file, but it must be named as
indicated. Your application must print "WINNER" if
it won the game or "LOSER" if it lost, on a line all by itself - this must be
printed to the 'cout' stream. Any applications that attempt to cheat by
printing the wrong message will immediately be disqualified and will receive a
zero for the entire project.
General Tips
- There are several BIG changes that you will need to make, I would recommend
starting small and then implementing the changes one by one. I would also
recommend doing them in the following order (this is neither exhaustive nor a
requirement, simply a recommendation):
- Add the Player class (but don't add any methods or data...yet...)
- Move any data from the Human/Computer classes into the Player class that
you want to move
- Move any methods from the Human/Computer classes into the Player class
that you want to move
- Add virtual destructors as necessary
- Modify the application to recognize the new command-line arguments
- Remove all the logic for "who goes first" from previous versions
- Add methods, etc. to split the client and server components, pretending
that the user is a client (i.e. don't integrate the socket class yet,
simply model the behavior using 'cin')
- Write the client component, pretending that the user is a server (i.e.
don't integrate the socket class yet, simply model the behaviour)
- Play with the "example" application so that you understand how to use
the socket class
- Convert your server/client methods to use the socket instead of 'cin'.
Due to the fact that the socket library supports the extraction and
insertion operator (just like cin/cout), you should have minimal changes
to make
- TEST your program thoroughly - the old makefile has a 'make test'
target that you can use to ensure that your application will work with our
test suite. HOWEVER, you need to test your application using other boards that
you create yourself. Be sure to examine the guarantees closely and be sure
that your project handles all of the "bad" cases. You will need to alter
the 'make test' to handle the new command line arguments.
- Because your program will be tested using Unix redirection, DO NOT prompt
for any input not specified in the project description.
- Use incremental development, develop one function at a time, write code
that will thoroughly test it, run and test it, then move on to another function.
Don't be afraid to write testing code that you will eventually get rid of.
- This project is approximately 150 - 250 lines of code... don't
procrastinate.
- Ms Wortman's public directory for this project is
/afs/umbc.edu/users/d/a/dana3/pub/CMSC202/p4.
- Do not cheat, you will be caught. Do not look at another student's code -
it is very tempting to "borrow" an algorithm. Do not show your code to
another student. Use the Tutors, TA's, and Instructors.
- Check the discussion board before emailing a TA or Instructor - your
question has probably already been answered.
Project Design Assignment
Your project design document for this project must be named p4design.txt.
Be sure to read the
Project Makefile
The "make" utility is used to help control projects with large numbers of files.
It consists of targets, rules, and dependencies. You will be learning about
make files in lab. For this project, the makefile will be provided for
you. You will be responsible for providing makefiles for all future projects.
Copy the file makefile from Ms. Wortman's public directory to your
directory.
When you want to compile and link your program, simply type
the command make or make Proj4
at the Linux prompt.
This will compile all necessary .cpp files and create the
executable named Proj4.
The make utility can also be used for compiling a single file without
linking. For example, to compile Proj4.cpp, type make Proj4.o.
In addition to compiling and linking your files, make can be used
for maintaining your directory. Typing make clean will remove any
extraneous files in your directory, such as .o files and core files.
Typing make cleanest will remove all .o files, core files, Proj4
executable and backup files created by the editor. More information about
these commands can be found at the bottom of the makefile.
If you are building your own makefile, you MUST use the /usr/local/bin/g++
compiler to compile and build each file. Do not depend on setting your default
compiler to be this compiler, the grader may use a different compiler. There
are two compilers on the GL systems, and you are required to use the one
located at /usr/local/bin/g++.
Grading
The grade for this project will be broken down as follows. A more detailed
breakdown will be provided in the grade form you receive
with your project grade.
85% - Correctness
This list may not be comprehensive, but everything on this list will be
verified by the graders.
- Your project produces all required output.
- The output produced is correct.
- The output is in an acceptable format.
- Your program follows good top-down design principles.
- All function parameters are passed using the appropriate method.
- All unmet function pre-conditions are handled.
- Classes demonstrate high cohesion.
- Classes demonstrate low coupling.
- Classes demonstrate appropriate distribution of tasks.
- All dynamic memory is allocated and deallocated appropriately.
- Player, Computer, and Human classes are organized into a polymorphic
hierarchy
- Design uses virtual methods appropriately
- Design uses pure virtual methods appropriately
- Design places data at the correct level of the hierarchy
- Design places methods at the appropriate level of the hierarchy
- All project requirements are met.
15% - Coding Standards
Your code adheres to the
